For makers who want reliable, repeatable results, mastering Bambu Labs Slicer is a game changer. This guide walks you through practical steps to use Bambu Labs Slicer for perfect prints, from setting up your first profile to fine-tuning details that matter in real-world parts. If you’re looking to streamline your workflow and reduce failed prints, you’ll find actionable tips that translate to better quality with less guesswork.
Getting Familiar With the Bambu Labs Slicer Workspace
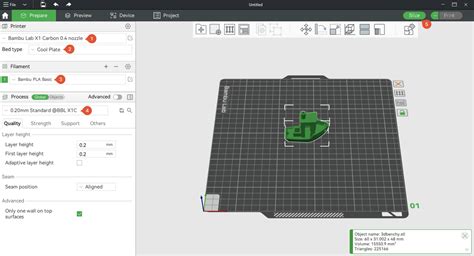
Begin by exploring the main panels: the material and profile selectors, the print settings, and the real-time preview. In Bambu Labs Slicer, you can quickly switch material profiles, view estimated print times, and inspect layer-by-layer previews. Use material-specific presets as a baseline, then tailor settings such as nozzle temperature, bed temperature, and cooling to your filament. A clear understanding of the workspace helps you make informed decisions before you start a print.
Preparing Your Model for Smooth Printing
Import your model and orient it for optimal layer adhesion. In Bambu Labs Slicer, reorient to minimize overhangs and place supports only where needed to simplify post-processing. Check the model for defects and use the built-in repair tools if available. A well-prepared model reduces wasted material and speeds up the calibration process, letting you focus on achieving the perfect surface finish.
Choosing and Tuning Print Settings for Perfection
Start with a reliable layer height and a proven infill pattern that matches your application. In Bambu Labs Slicer, adjust the layer height to balance detail and print time; smaller layers yield smoother surfaces but take longer to print. Fine-tune extrusion width, flow rate, and retraction to minimize stringing and oozing. Enable features like adaptive or variable layer height when supported, and set the correct seam position to avoid visible printing artifacts. Always preview the toolpath to catch issues before you print.
Key Points
- Begin with material-specific presets in Bambu Labs Slicer and customize only what you need to optimize quality.
- Use adaptive or variable layer height to maximize detail where it matters while maintaining speed elsewhere.
- Calibrate extrusion and flow precisely to maintain dimensional accuracy across complex geometries.
- Strategically place supports and optimize seam location to reduce post-processing work.
- Validate with a small test print and review the first layers closely to avoid large failures.
Practical Workflow for a Perfect Print
Follow a repeatable sequence: import, orient, slice with a baseline profile, preview the path, and then export the G-code. In Bambu Labs Slicer, use the preview to confirm that supports and bridges are correct, the cooling fan behavior is appropriate for the filament, and the first layer looks level. After exporting, perform a quick bed calibration check and run a small test print to verify that everything behaves as expected before committing to a full print job.
Final Checks, Calibration, and Troubleshooting
Even with a good profile, small issues can arise. Re-check bed leveling, confirm nozzle temperature stability, and verify that filament quality is consistent. In Bambu Labs Slicer, review any warnings about filament diameter, retraction, or temperature stability. If prints fail, consult the preview for potential hotspots, such as sudden changes in speed or temperature, and adjust accordingly. Keeping a simple, repeatable workflow helps you iterate faster and achieve dependable results.
What is the best starting profile in Bambu Labs Slicer for PLA?
+Start with a standard PLA profile that lists a nozzel temperature around 200°C, a heated bed around 50–60°C, and moderate cooling. From there, fine-tune based on your printer’s nozzle size and filament brand, iterating in small steps while checking the first layer adhesion and surface finish in the preview and a small test print.
How do I enable adaptive layer height in Bambu Labs Slicer?
+Look for the advanced or experimental features in the slicer and toggle on adaptive layer height. Set minimum and maximum layer heights based on your detail needs, and ensure the slicer updates the toolpath accordingly to preserve critical features while reducing overall print time where possible.
Why is my first layer not sticking when using Bambu Labs Slicer?
+First layer adhesion can be affected by bed leveling, nozzle height, and initial extrusion. Recheck the bed level, confirm the Z-offset, and ensure the bed temperature and initial layer height are appropriate for the filament. In the slicer, ensure the first-layer height is set to a slightly higher value for better adhesion and inspect the live preview to confirm a consistent extrusion line.
Can I use Bambu Labs Slicer with non-Bambu printers?
+Yes, many users export G-code for different printer brands, but you may need to adjust machine settings and profiles for non-native hardware. Start with conservative speeds and temperatures, then tailor the profiles based on test prints and the printer’s capabilities.
What steps help ensure successful prints after exporting G-code from Bambu Labs Slicer?
+Double-check the origin point and bed level, confirm that the filament diameter matches the slicer input, preview the entire toolpath for any anomalies, and run a small calibration print before committing to a larger part. This practice catches issues early and saves material.